Your environment is your workshop
As a developer, you will spend some time with your terminal —even if you prefer a GUI. You will run tests, install packages, and use Git, for example. And yes, Git has a GUI, but for some advanced operations you are forced to use the command line. Anyway, the terminal is one of our essential tools, and it's nice to have a visually pleasant and powerful terminal instead of a boring and limited default one. I like to think about it like this:
Your environment is your workshop and it is more logical to adapt your workshop to your need rather than the contrary.
A good tool, for me, is one that disappears when you use it. It’s not noticeable because it’s just right for the job it’s supposed to do. It’s frictionless and allows you to focus on the work rather than struggling with the tool. That is what I ideally want to achieve in my tooling setup.
In this post, I will explain how I like to configure and personalize my terminal emulator and hopefully some of this tweaks may be useful for you. We will explore as well what a shell is, what a terminal is, the different kinds of shells available, and how to take better advantage of our terminal configuration. All the examples and configurations will be for MacOS system, although most of them can be applied with small adjustments to Linux as well.
I don't need you to use my setup. My point is that a better world exists—one where you have limitless possibilities and the tools you deserve. Many software tools were created precisely because their creators weren't happy with what was available. And that, I believe, is the essence of engineering: solving real-world problems through technical expertise.
‘Terminal’ is said in many ways
There are a lot of terms that usually are used to refer to the same thing: Terminal, Shell, Command Line, CLI, Console... But not everything is the same. To better understand what we're about to do we need to understand the difference between Shell and Terminal.
The terminal was a device that permitted transcription and entering data in the early computer era. It was an electromechanical device that set and received data from the host, which was called the mainframe. Similarly, nowadays a terminal emulator is a program that provides a text-based interface for human-computer interaction. Different terminal emulators can be GNOME Terminal, Konsole, xterm, Kitty or Warp (an AI enhanced terminal emulator).
Operating systems come with a default terminal emulator, but it's easy to install a different one if preferred, specially if you are working on a UNIX-like system. Later on, we will install another terminal emulator to add more functionality to our system.
What's the shell?
A shell is an interface for interacting with the kernel. Like any other interface, it hides the internal functions of the kernel and only exposes what the user needs. While the term 'shell' can technically refer to any interface, including a Graphical User Interface (GUI), it is most commonly used to describe a command-line interpreter (CLI). In both cases, the intent is the same: to expose the operating system’s services to users or other programs, with the shell acting as the outermost layer of the operating system. In other words, the shell encapsulates the operating system’s kernel and isolates it from user space. That’s why it’s called a shell.
The command-line shell is an interpreter that runs inside the terminal. We can change our terminal emulator—for example, switching from the macOS Terminal to iTerm2—but as long as we don’t change the shell, we will interact with the system in the same way. The terminal emulator is merely an graphical interface for the shell, which is what we are actually interacting with.
The shell (for examples zsh) can run other processes, for example utilities like grep, ls or cat.
What happens when you run a utility like nano:
ls (user-level application) doesn’t interact directly with the hardware.- It sends system calls (like
getdents() or readdir()) to the kernel.
- The kernel translates these system calls into lower-level instructions and interacts with the file system and the hardware (such as the hard drive or SSD) to retrieve or modify data.
- The device driver specific to the storage hardware manages the communication between the kernel and the physical storage device.
Here we can see the general schema of the linux architecture here:
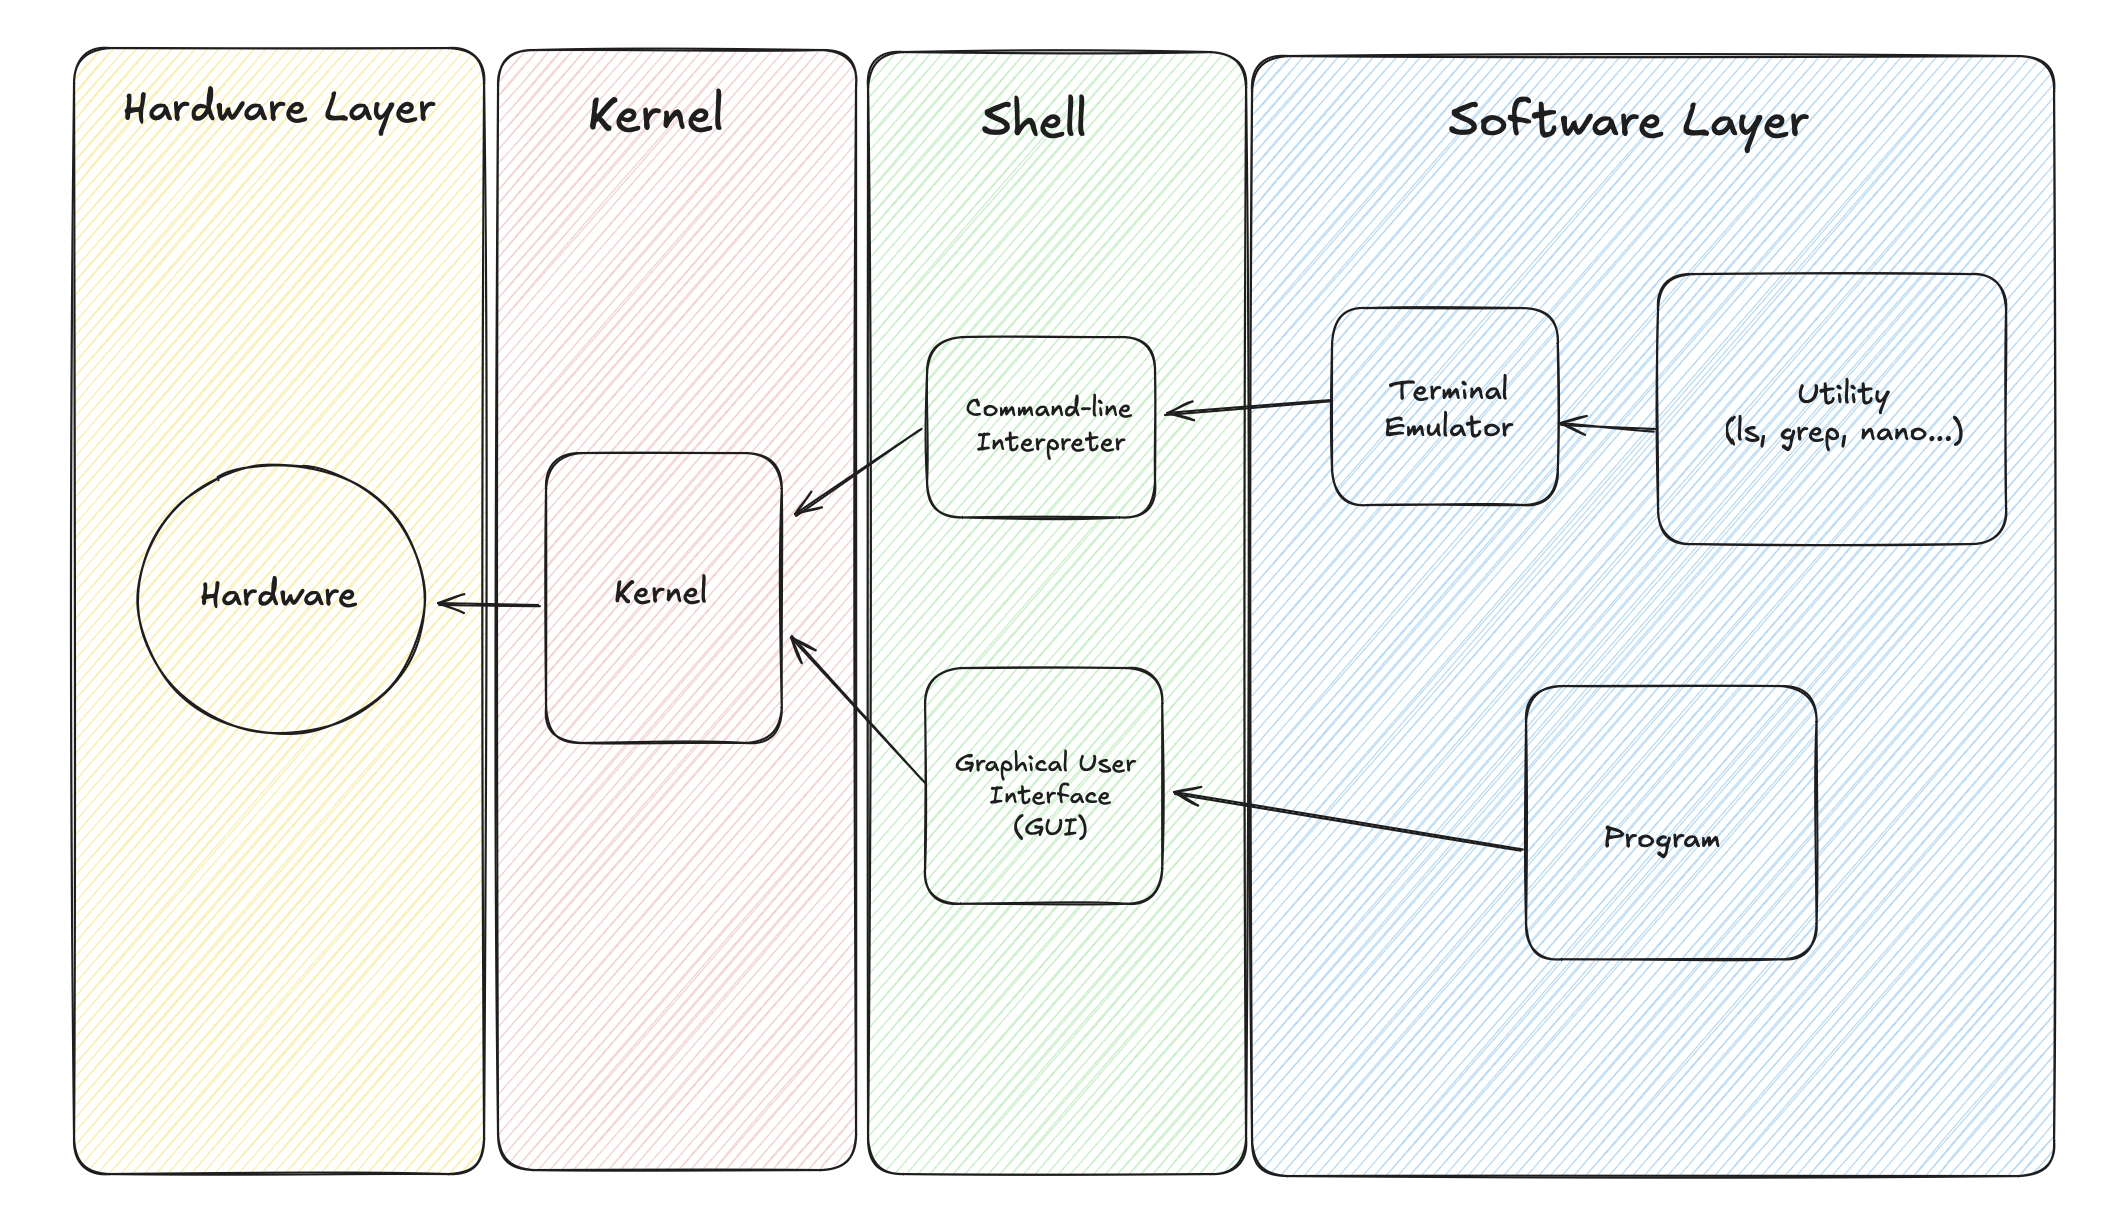
The shell has evolved from a basic command interpreter, the Bourne Shell (sh) (1979), through significant improvements with the Bourne Again Shell (bash) (1989), to a highly versatile and feature-rich tool, the Z Shell (zsh) (1990). Many Linux distributions use bash as the default shell, while most BSD variants rely on sh. Since macOS Catalina (2019), zsh has been the default shell on macOS. If you're interested in the evolution of the shells, please, check out this IBM site.
To summarise it, a terminal emulator is a program that provides a text-based user interface. It sends user inputs to the shell and displays the shell’s outputs. The shell is a command-line interpreter that translates high-level commands into system calls to interact with the kernel (the core of the operating system). The kernel manages system resources, including the CPU, memory, and file system. When a command is executed, the kernel performs the requested operations and returns the result to the shell, which then outputs the result to the terminal emulator for the user to see.
Shell in UNIX-like systems
In UNIX and UNIX-like systems, the current shell is usually defined by the environment variable SHELL. This variable specifies the path to the binary of the default shell. Typically, this binary is located in the binary directory /bin (for example, /bin/bash or /bin/zsh) or /usr/bin. Since the shell it's an application, it can be easly replaced by another one. In Linux you can find the default shell as well using cat /etc/passwd | grep $USER.
Bash and Zsh are maybe the most used shells in UNIX-like systems. Debian, Fedora, Arch and may other linux distributions use Bash as a default shell. Ubuntu, Kali and Parrot use Zsh. As of macOS Catalina (10.15), the default shell for macOS was changed from Bash to Zsh. This change was due to the release of the GPLv3 license, which explicitly disallows the use of GPL-licensed software in a closed system that does not allow the user to modify the software and run it on the machine (see tivoization).
To find out which shell you are currently using, you can execute:
If you want to change your shell to another one, you can run:
SHELL variable is temporal and session scoped, which means that it's deleted when you terminate the session. Typically, the system sets the SHELL environment variable based on the default shell specified in your /etc/passwd file. But this setup can be overwritten by the other configurations, like your terminal emulator configuration.
If you want to persist your shell configuration you can use this command instead:
And you always can run bash to switch to bash and run zsh or exit to switch to zsh again.
Installing terminal emulator
On macOS, iTerm is the most popular terminal emulator in the dev community. While it resembles a classic console, it offers powerful features like split views, multiple tabs, customizable hotkeys, and extensive configuration options. Accessing the Preferences menu in iTerm reveals a wide range of settings you can adjust to personalize your experience.
iTerm key features:
- Multiple tabs and split view (panes).
- Find and filter content in the terminal
- Session Management. Reopen all the tabs exactly as they were.
- Good theming and customization options.
Terminal Comparison table
| Search | Mouse support | Theming | Autosuggest | History | O.Source | Stability |
|---|
| MacOS | Basic | Basic, no TUI | Basic | No | Basic | no | Great |
| iTerm2 | Great | Full, tmux | Good | Add-on Shell Integration | Good | yes | Great |
| Warp | Great, block | Full, Multiline | Great | Great, AI powered | Great | no | Good |
Tips for using iTerm2
When you open a new pane in iTem2 you probably see something like: Last login: Fri Sep 27 20:11:13 on ttys006. To know all the sessions you are running, use who or w commands. In the output you will see all your terminal sessions running and your system process with the uptime, so at least you will have two results.
Depending on your default permission settings you can experience the "operation not permitted error". If this happens to you, you need to go to your MacOS setting, select Privacy and Security and give Full disk access to iTerm2.
WARNING: Modifying the iTerm color scheme may prevent text colors from displaying correctly. If you encounter this issue, check the Minimum contrast property in your profile settings and reduce its value.
The terminal in Linux is very powerful. There are even linux distros without Desktop Manager, like Arch Linux.
CMD + Shift + Enter to maximize the current pane in iTerm2.
CMD + Option + Arrows or CMD + [ or ] to switch between the panes.
Oh My Zsh: Unleash your terminal
By default zsh comes with very poor configuration, although it has a lot of potential. For example, you can configure a lot of options with setopt command. For example for history you can configure:
setopt APPEND_HISTORY           # Append commands to history file immediately
setopt SHARE_HISTORY            # Share history across multiple terminals
setopt HIST_IGNORE_ALL_DUPS     # Avoid duplicate history entries
setopt HIST_REDUCE_BLANKS       # Strip extra spaces
setopt HIST_VERIFY              # Edit before executing history expansion (!stuff)
and for navigation:
setopt AUTO_CD                  # Just type directory name to cd into it
setopt AUTO_PUSHD               # Push to directory stack when cd-ing
setopt PUSHD_IGNORE_DUPS        # Don't store duplicate dirs in stack
setopt EXTENDED_GLOB            # Advanced globbing like (**/*.txt)
But there are much more options and it's a burdon to configure everything and install different plugins manually. Theres is a better option which is a configurator. OhMyZsh is the most popular one. It'a a framework that gives you plugins, themes and configurations right away and makes the setup much easier.
Unleash your terminal is the slogan of Oh My Zsh, an open source community driven Zsh manager. This is one of the quickest and easiest ways to get a powerful yet beautiful terminal in a few steps. They promise you:
Once installed, your terminal shell will become the talk of the town or your money back!
To install Oh My Zsh you can:
sh -c "$(curl -fsSL https://raw.githubusercontent.com/ohmyzsh/ohmyzsh/master/tools/install.sh)"
Some of the OMZ themes require special fonts to show icons and special characters in the terminal. To install the fonts you can go to https://www.nerdfonts.com or just use:
brew install fonts-powerline
or
brew install --cask font-hack-nerd-font
The great thing about ZSH is that the support is great and the community is very active, so you can find lots of documentation, configurations and interesting stuff about it online.
The only problem is that out of the box ZSH is poorly configured and it's even worse than bash (reverse search, command history and completion system). But, we have Oh My Zsh, a community configuration that enables all the most useful functionalities to ZSH and gives it a nicer aspect. Oh My Zsh includes aliases, themes and acts like a plugin manager.
OMZ themes
Your theme, as many of your other configurations is stored in .zshrc file.
You can check the actual theme by printing by ZSH_THEME variable.
To switch between themes you can:
omz theme list
and set a theme by:
omz theme set THEME_NAME
You can preview all the different themes at https://github.com/ohmyzsh/ohmyzsh/wiki/themes
Be aware: Oh My Zsh (OMZ) modifies your .zshrc, so there's a chance of losing some of your configurations that use this file (for example, SDKMAN!). Luckily, you can find your previous configuration at ~/.zshrc.pre-oh-my-zsh.
If you do some mods to your terminal and add some icons and fonts in the iTerm, you won't see these changes in your VSCode terminal. You will need to specify the fonts for this terminal and all other terminals you use as well.
Once you select a theme that you like, you can adjust the colors to your preference. Alternatively, you can visit https://catppuccin.com to download a well-built color scheme that you can use across your other code editors.
Autocomplete fix
Download zsh plugins:
git clone https://github.com/zsh-users/zsh-autosuggestions ~/.oh-my-zsh/custom/plugins/zsh-autosuggestions
git clone https://github.com/zsh-users/zsh-syntax-highlighting.git ~/.oh-my-zsh/custom/plugins/zsh-syntax-highlighting
git clone https://github.com/zsh-users/zsh-completions.git ~/.oh-my-zsh/custom/plugins/zsh-completions
git clone https://github.com/zsh-users/zsh-history-substring-search.git ~/.oh-my-zsh/custom/plugins/zsh-history-substring-search
Add this plugins to .zshrc
autoload -Uz compinit && compinit

plugins=(
    git
    docker
    asdf
    zsh-autosuggestions
    zsh-completions
    zsh-history-substring-search
    zsh-syntax-highlighting
)
you also can edit the editor section:
# Preferred editor for local and remote sessions
if [[ -n $SSH_CONNECTION ]]; then
   export EDITOR='vim'
else
   export EDITOR='mvim'
fi
The prompt
In Oh My Zsh themes, the prompt is already customized out of the box. Nevertheless, if you want something more personalized and built exactly to your needs, you can create your own prompt by configuring special variables in your .zshrc file (for example: PROMPT='%n@%m %~ %# '). Alternatively, you can use a plugin. Back in the day, Powerlevel10k was very popular in the Linux community, but it's no longer actively maintained. However, there are other alternatives like Oh My Posh or Starship.
Starshipis is the most interesting one. It's a fast and customizable prompt for any shell. It allows you to configure your prompt to display information like Git status, system performance, time, and much more in a clean and minimalistic style, without slowing down your terminal. It's highly modular, making it easy to add and adjust functionality.
Aliases
Aliases are one of the most useful features of the shell. An alias is a custom shortcut for a command or a group of commands. It allows you to run complex or frequently used instructions with a simple keyword in your command line. You can create as many aliases as you want and combine them to build a workflow that fits your needs better. You can read a full post on that in my post How to use alias. But let's see some basics:
In ZSH you can create an alias using the alias command like this: alias ll='ls -alF'. To list all defined aliases, simply type alias. If you want to check a specific alias, pass its name as a parameter, for example: alias ls. To remove an alias, use the unalias command followed by the name of the alias you want to delete, like this: unalias ll. These aliases are created in you current terminal session, which means that they are not persisted over the sessions.
If you want your aliases to persist across terminal sessions, you need to add them to your .zshrc file or to a custom aliases file that you source from .zshrc. You can do it using redirector: echo "alias ll='ls -alF'" >> ~/.zshrc (but in this case you need to be careful to not itroduce duplicated aliases). After adding or modifying your aliases, you can reload your configuration by running source ~/.zshrc, or omz reload if you are using Oh My Zsh.
If you often add or update your aliases, it's useful to create an alias for reloading your config, like this:
alias resource='source ~/.zshrc && echo "Zsh reloaded!"'
A Gotcha with Oh My Zsh and AUTO_CD
If you are using Oh My Zsh or Zsh with AUTO_CD enabled, and you try to enter a directory by typing its name (e.g., git), but there is a program with the same name (e.g., /opt/homebrew/bin/git), the program will be executed instead of changing directories.
This happens because Zsh prioritizes executables in your PATH over the auto-cd feature. To access a directory that shares a name with a program in your PATH, you must use the cd command explicitly. Alternatively, you can disable the AUTO_CD feature by running unsetopt AUTO_CD.
What's up with Tmux
Tmux, which stands for Terminal MUltipleXer, is another way of doing things. With tmux you can create a session in a machine, run some commands, detach from it, start another session to run other processes and then attach back to the first one. You can even detach from an SSH session and attach to it from somewhere else using another machine. This is very useful if you frequently use SSH (Secure Shell protocol) to connect to remote machines. Tmux can be customized and there are a lot of community-based setings like Oh My Tmux! that offers a quick setup with the most used features and a nice appearence.
A lot of people use TMux as a tiling window manager, but iTerm2 and other modern terminal emulators can manage panes in a way similar to TMux. So, if you're already using a custom terminal emulator and don't need session persistence, you might not need TMux.
On the other hand, if you're accustomed to TMux’s way of managing windows and want to make it portable across different machines or need session persistence, then TMux can be the right choice for you.
Luckily, iTerm2 integrates with TMux, and you can find the details by going to Settings > General > TMux.
Don't repeat yourself: automate it!
As you can see, it's a long process. But, if you have a configuration that you really like, you can automate it. One way to do it is to use a script. There are multiple scripts on the internet for personalization, like this one for Parrot Linux with bspwm: https://github.com/xJackSx/BSPWMparrot. Another idea is using ansible to automate the installation. Ansible is cleaner than bash and it uses YAML files to guide your installation. This is out of the scope of this article, but there's something easier we can do to organise and save all our configuration files.
Files like .zshrc, .oh-my-zsh, .gitconfig, and .config/nvim/, also known as dotfiles, reside in your home directory, and over time, you accumulate quite a lot of them. However, when setting up a new machine, you don’t have all the configurations you've built over the years.
To transfer this configuration to a new machine, you can create a dotfiles repository. To do this, create a new folder in your home directory (for example, called "Dotfiles"), move the files you want to track into it, and then create symbolic links (soft links) back to the home directory so that programs can read them. The sequence of commands can look something like this:
mkdir -p ~/dotfiles
mv ~/.zshrc ~/dotfiles/
ln -s ~/dotfiles/.zshrc ~/.zshrc
Symbolic links, or symlinks, are a great option for managing dotfiles in a Git repository because they allow you to link directories, preserve the logical structure of your filesystem, and are easy to track and remove. They also have support for cross-filesystem linking. But if you don’t want to create all the symlinks one by one, you can use GNU Stow to automate the process. Once you have stored all the necessary configuration files in your dotfiles directory and created the links, you can add this directory to a Git repository to keep track of your configuration files.
When you modify any configuration in the files within your home directory, the actual linked files in your dotfiles directory will be updated as well, allowing you to commit and push these changes to the remote repository. Now, anytime you get a new machine to setup, you can just pull the files from the remote repository and create the symlinks in your new system.
One more thing you can add to this directory is a list of all the packages you have installed with Brew. For that, you can run the following command:
brew bundle dump --describe
This will generate a dump file called Brewfile with all your packages in your working directory. Keeping track of this file will help you to reinstall all the needed software in your new machine. To install all the packages from a Brewfile, the only thing you need to do is run brew bundle install in the same directory where you Brewfile is located. You can find more info about how to use brew bundle at Brew Bundle Brewfile Tips.
Downsides of using iTerm + OMZ
iTerm2 and OMZ are very powerful tools, and their configuration is quite straightforward. However, they have their own drawbacks. One of the major downsides of this setup is speed. iTerm is an excellent terminal emulator, but to be honest, it’s not the fastest one. There are other terminals that are more performance-focused, such as WezTerm, Kitty, and Alacritty. You can see benchmark results in this tweet.
On the other hand, OMZ also increases the TTI (time to interactive). Depending on your terminal usage, this may or may not be a significant issue for you. Personally, it’s not a problem for me. But if you want a blazing-fast terminal that lets you open and close multiple windows with almost no delay, you should probably try one of those alternatives. As you can see in the performance benchmarks, the more features a terminal emulator has, the slower it becomes. So, it’s up to you to decide where to draw the line between performance and features.
Another drawback of iTerm2 is that it's not designed to be configured primarily via a config file. While it's possible, the configuration file is not as readable as YAML or TOML, which many other terminal emulators use. So, if you want to automate terminal configuration and rely on a config file, iTerm2 might not be the best option.
